Warming the shack

The power supply, receiver, transmitter and station monitor/phone patch, plus microphone and key
Collins S-Line Station

For several years, I have been putting together a Collins S-line station, and earlier this week, I fired it up for the first time.  This station was the top of the line, when it was produced in the 1960s, and although there have been plenty of technical innovations along the lines of improved frequency stability, image rejection and DSP, these units still sound great.  Now that winter is approaching and the basement is growing chilly, I was more motivated than ever to get this tube equipment on the air.

I have had these radios packed up for quite a few years, not really wanting to ship them all over the world as we moved. Last year, I started putting them back into order. I started by looking through the archive at the Collins Collectors Association and joining their email list. Between the archive and routine access to people who know these rigs inside and out, I came up to speed in no time.  I didn’t see anything too amiss on my inspection of the rigs, aside from some carbon residue near the rectifier tube in the power supply. This is a common defect in these supplies — some arcing occurs from the rectifier tube to the metal cabinet, so I wasn’t too worried about that, but realized that the rectifier socket would need to be replaced by a ceramic one down the road.
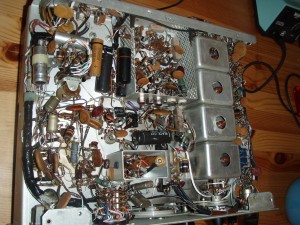
photo of the underside of the 32S-3 transmitter
I took a lot of photos during the survey phase to provide some insurance that I'd be able to reassemble the radio after working on it. The underside of the 32S-3 transmitter showing extensive point-to-point wiring. The "black beauty" capacitors are prominent. They and the surrounding silver-colored electrolytic capacitors were replaced.

The most likely items to fail in rigs of this age are the electrolytic capacitors, so I went through each unit and replaced all electrolytic capacitors, plus any paper capacitors and some of the less reliable “black beauty” oil-filled caps. There is some debate about whether it is better to replace preemptively or only when there is evidence of failure, but I leaned towards the preemptive side. While I want to preserve the original engineering, I also want these units to perform well and get some actual on-the-air use.  The other obvious thing that can fail are the tubes. Of course, I can’t just run down to the corner store anymore and use their tube tester. To put that statement in context, these radios are just slightly older than I am.

There are a lot of patch cords that run between the station components, some audio, some RF. These and the power plugs and control connectors had degraded to the point that I wanted to replace them. I rebuilt the connecting cords and power cords using the original plugs and sockets, but for everything else, I visited Joel at RF Connection in Gaithersburg, Maryland. Conveniently, his store is about five miles from where I work, and it is packed with every connector, cable and adapter known to man. He also stocks a lot of the materials used in restoring Collins equipment, including replacement feet. Yes, I replaced the little rubber feet, because they also had degraded over time.

photo of a capacitor deep within a metal slot
This was my favorite capacitor to replace -- deep down in a metal pocket that I couldn't disassemble. It was like soldering a ship in a bottle.

After inspecting the units, I took each out of its cabinet and to greater or lesser extent stripped them down. All the tubes came out and everything got a thorough cleaning. All the pots got a shot of deoxit, and other bits of mechanical tune up were performed. I replaced the burnt out panel lights with long life replacements from D.A. Buska Engineers, LLC.  These LED lamps should last just about forever, which is good because it is something of a hassle to replace bulbs. It involves my wrist bending in ways that seem unnatural. However, I would think twice about using the LED lights again if I did another restoration. Their light is harsher than the original incandescent lamps, and there is some barely perceptible flicker.

After putting everything together came the smoke test. Since these rigs had been off for more than two decades, I approached this cautiously. I tested each unit separately, bringing power up slowly using a variac (auto-transformer). The power supply came up to voltage and all the supply outputs tested nominal. The receiver also powered up, and when I hooked it up to an antenna, it seemed reasonably sensitive. The band calibrator seemed to work, and put the dial right on WWV. I flipped through the different bands, and could hear signals on all of them.

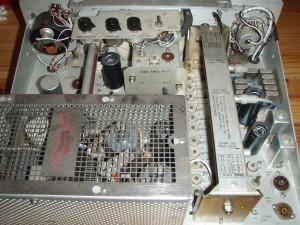
Photo of the upper deck of the transmitter, with the final amplifier cage in the foreground
The top side of the transmitter. The front of the radio and the main tuning dial are in the rear, the final amplifier cage is in the foreground. A bunch of the tubes have already been removed at this stage.

The transmitter was more complicated. When I got to about 80V on the variac, a thin wisp of grey smoke wafted upwards from the power amplifier section of the transmitter. I couldn’t find where the smoke was coming from, but the take home message was clear — I needed some professional help.

Even if I had not hit this snag, I would have sent the radios in for some professional servicing at this point. After such a long period on the shelf, they were in need of a laboratory realignment, which is beyond what I can do with my current equipment. I also wanted someone who really knew Collins equipment to look them over.

I contacted Peter Wittenburg at Collins Rebuilders. He is located near Annapolis, Maryland, which is close enough that I could carefully pack the rigs in my car and drive them up. It was definitely the right call — the radios got the love and attention that they deserved from an expert. Peter swapped out the rectifier in the power supply, fixed a fairly major problem in the receiver’s permeability-tuned oscillator (not for the faint of heart), replaced a few tubes that had seen their day as well as a few other discrete components that were not up to spec.  He ran the rig through its paces and gave me a nice report, that shows by and large, the rigs were seaworthy.

An Astatic microphone
An Astatic D-104 microphone.

While he was performing his analysis and repairs, I picked up an Asiatic “lollipop” microphone with the proper Collins connector at a hamfest. I had previously borrowed a variac for testing, but decided to purchase one for fulltime use in the station. The Collins equipment was made for a time when the line voltage was lower than the present, and higher voltages will shorten component life. The whole station is now plugged into an isobar strip that itself is plugged into the variac, which maintains voltage at 117V RMS. The station is turned on/off with the isobar rather than each unit’s power knob, as those knobs are all but irreplaceable and are prone to mechanical wearing.

Over last weekend, I made sure that my attic antennas were tuned up, presenting less than a 2:1 vSWR across their useful ranges, as the tube equipment is not tolerant of (read: smokes when confronted with) less well-behaved loads. The ionosphere was revved up as high as it has been in the last decade or so, which boded well. I made my first contact on 40m with WB8PPH (“wb8-pumpkin-pie-headquarters”), who was running a special event station for the Circleville Ohio Pumpkin Festival. I had a few more contacts with PA, IA, and IL and then Sweden, England, Croatia and the Czech Republic on 20m, and Cuba, Honduras, Mexico and finally South Africa on 10m. The received sound quality was golden, and I received favorable reports concerning my audio quality as well.

schema of s-line wiring between different modules
Interconnections for transceiver operation.

The rigs can be run in transceiver mode, where the transmitter is slaved to the receiver’s VFO, or they can be run independently, with the both the receiver and transmitter VFOs in action; this is what you would have to do to operate split, for instance, as there is no other RIT/XIT function. Separate operation is also the way to go for CW operation. In transceiver mode, you would hear nothing when zero-beat to the incoming signal (naturally), and the offset in CW mode is 1.3 khz, which is impractically large. To operate CW, I picked a clear frequency and used the “cw-spot” function on the transmitter to send a low-level signal to the receiver, allowing me to adjust them to the same frequency. I did one round of calling (straight key, natch) and had an immediate reply from Northern Ireland and Bulgaria. I had a little difficulty getting the vox-balance right to accomodate semi-breakin operation (some hangtime after transmit so the relays aren’t constantly clicking, but not so much that I miss the reply). According to the overseas stations, there was no problem with key clicks or chirps, so I guess we’re okay on that front as well.

I’ve never been a big fan of sideband, but I got a big kick out of working stations with this rig, and I think I might be spending more time behind the mike this winter.

QRV à Montréal

Graffitied picnic table with Tentec 1320, Winkeyer, Palm Paddles, and wiresI’m up in Montreal for a conference on rare diseases and the agenda is pretty tight. However, after meetings ended this afternoon, I scampered northwards from the hotel, up past McGill University, heading for the high ground of Mont Royal Park. The downtown is a canyon of metal buildings, but ground slopes up as you head north, away from the river.  I actually didn’t climb to the top of Mont Royal — I stopped when I found a picnic table about half way up. The top of the hill sports a bunch of antennas, and I thought it best to keep some distance from other radiators (and the giant metal crucifix at the top of the hill. I’m not sure if it radiates, but I didn’t want to go near it either).

My picnic table was already decorated by the local artisans with their initials and names, so I knew it was something of which they were proud. Conveniently, but not too surprisingly, there was a tall maple tree nearby, and the antenna went up in one throw (because no one was looking). I set up the TenTec 1320, the Hendricks SLT+ tuner, and my Swedish lead-acid battery. I should mention that this time, TSA had no problem with lead acid batteries. I guess that was last week’s policy.

I was operating as “AI4SV/VE2”, which is a quite a mouth [fist] full. The first station I worked was Ivan, IZ4DLR, who gave me a 569. He was running 200W into a 3 element beam. I informed him that his beam was performing very well both coming and going. My next contact was with Stan, N7OC, who was also running 5W in Custer, Washington. I was pretty happy with the distances — Italy and Washington within a few minute of each other. I had a few more contacts, working Virginia, South Carolina, and even one station in the Arizona QSO Party. I hope I was a multiplier for him. I’ll have to think about what station category I’d be in that contest — Single op, single transmitter, single band, cw only, qrp, portable, Candian.

A basket of friesOn the way back, I stopped by a restaurant advertising itself as a transplanted Belgian fritérie. It was nice to see a place that served different sauces with their fries, but the fries themselves were a bit overcooked, and the sauce andalouse could have been a bit spicier. Nonetheless, their beer was good, and they had hockey on a big TV, so it was still worth the trip.

Visiting with Swedish Hams

Continuing the visit to Sweden from the previous post

Saturday morning, Kjell pulled his car up to the hotel, and we took off towards the village of Dalarö. Along the way, he showed me his mobile set-up, which included a Kenwood mobile rig set up for ARPS and an associated GPS unit.  As we drove, he gave me a brief run down of the history of the area and what was going on in terms of ham radio activity.

A scan of a business card from the restaurant SaltskutanAfter about fifteen minutes, we arrived at quiet village on the water (I realize “on the water” may not be very informative when it comes to an archipelago). Kjell mentioned that this particular village is popular among the well-off who maintain summer cottages there. One of the stops on our tour of this town was the tiny sea cabin that belonged to Anders Franzen, the archeologist who discovered the 17th Century wooden ship Vasa, preserved in the brackish waters of the Baltic.  For lunch, he took me to a restaurant in the building that at one time has served as the customs house (tullhuset) for ships bring in goods. The meal was very tasty and involved a meat similar to bacon, but thicker, served over what I think was a potato pancake.

A photographic qsl card for club station sk0qoAfter eating, we continued the trip towards the club station, SK0QO. The station is located on the Gålö peninsula, which until fairly recent times was an island. The station has been there for about a year, and the club owns the building, which is on the edge of some farm land. Driving up to the station, I noticed that they had a number of dipole antennas strung up, a vertical, and I think even a discone.

A number of hams were present at the station, some on the air, and others preparing for their annual hamfest, which will occur next week. I learned that the club is among the largest in Sweden, and that they frequently take part in contests.

The club house has a main room with a central table and a corner fireplace. One rig was set up on the table for QRP voice. I could hear some morse code sounds coming from behind the door to a side room. I peeked in a found a few operators on an IC-7000. It turns out that one of the operators was Jonas, with whom I had a CW QSO the previous day. He filled out a QSL card on the spot, and handed it to me, which is about the fastest turn around time I think I will ever have for a “dx” QSL. Afterwards, Kjell snapped a photo of some of us out in front of the station.

Photo with some Swedish hams in front of the SK0QO club stationJonas explained that on the previous day, by the time our qso took place, he had been operating for a few hours, mostly in English, and was relieved to hear a Swedish call — which turned out to be me.  I was relieved to learn that he had, in fact, sent to me in Swedish and that there wasn’t something wrong with my listening skills.

Also in the photo are Olaf, who oversees the station itself, and Carin, who is working on her sea captain’s license, and was also sending morse code that day.

After a nice time chatting with the hams at the stations (all of whom spoke excellent English), Kjell took me to visit his friend Sven, an extraordinary homebrew experimenter who definitely has “the knack”.

Sven is interested in monitoring the planet’s Schuman resonance, an extremely low frequency (i.e., 7 Hz fundamental) signal, and he has gone to extreme lengths to build his own equipment to do so. It is well worth reading Kjell’s excellent article on Sven’s efforts. What is amazing is that Sven has built equipment sensitive enough to isolate these tenuous signals, and that he does it in a populated area, where radiation from power lines, heating systems, and every other domestic electrical device complicates the situation.

This was no small task, and Sven is willing to put in an extreme effort. He has, for example, entirely cut AC power to the second floor of his house, where he has built a magnetic loop antenna the size of an upright piano. The coil itself is suspended by elastic supports and the ceiling and walls are covered in anechoic material to avoid acoustic vibration of the coil. He has gone so far as to “tune” the room itself, by positioning baffles to null out the room’s intrinsic acoustic resonances. No half measures there.

a map showing the route driven earlier in the day as reported by ARPSAfter all of this, I thanked Kjell for being an amazing host and for extending such a warm welcome to a visiting ham. We agreed to set up a sked at some point, and I hope we’re able to meet on the air in the future. Later that evening, Kjell sent me a link to our APRS tracked route from earlier in the day.

I was able to get on the air again that evening from the hotel room using a longwire thrown out my 8th floor window. Even with this very suboptimal antenna arrangement, I worked two stations on 20m, one in Wales, and one in the Czech Republic. For kicks, I did try the rockmite on 40m. I didn’t get any replies, but I did at least show up on a Netherlands reverse beacon monitoring station at 8dB above noise.

On Sunday, I again hiked into the woods behind the hotel, spent about two hours on the air, and worked eight stations (in Russia, Germany, Italy, Slovenia and England). I turns out that I was lucky, as not too long afterwards, a series of solar events disturbed the ionosphere for a few days. In all, I worked 14 stations and 9 DXCC entities with my 5w 20m transceiver.


SM0/AI4SV versus the TSA

Last week, I attended the European Cancer Organisation (ECCO) conference in Stockholm. Most of the time, I was either at the conference, or at side meetings that took place between meeting sessions. My schedule was pretty tight, but I packed my QRP bag in case I had some free time.

My plans almost ended at Dulles Airport. The United Airlines baggage clerk gleefully told me that my suitcase was about 500 grams over the limit, and that it would cost an extra $200 to ship it to Europe. I reached in, took out my QRP bag, and brought the suitcase weight back under the limit.  I had hoped to pack the QRP equipment in the checked luggage rather than to carry it through security, but having travelled many times with the same equipement, I wasn’t really worried about it. That was something of a mistake.

A TSA agent adjusts his light blue vinyl examination glovesWhen my QRP bag went through TSA screening, as expected, they wanted to hand-inspect it. They pulled the sealed lead battery out and said that it couldn’t go on the plane — they were unable to get a good image on their x-ray machine. I replied that this made some sense, it was, after all, a lead battery. I suggested they rescan it, rotating it 90 degrees in one axis or the other, so that the lead plates would be parallel to the beam. I got a puzzled expression. I explained that the exact same battery had gone through security many times, including at that same airport on other international flights, and had not been a problem. I wasn’t getting anywhere, though, so finally I let the issue drop, handed the battery to the TSA agent, and said he could keep it. I suppose they must have a nice collection of confiscated electronic gear by now, so they are probably in need of some batteries as well.

On the flight over, I wracked my brains trying to think where I might find a suitable power source, with limited times between meetings. I recalled that batteries were expensive in Belgium, and assumed that the cost would be similar across the EU, related primarily to ecological concerns about battery waste — in fact, I had guessed batteries would be even more costly considering exchange rates and Sweden’s reputation as a green country. One option I considered was visiting the hotel’s business center and borrowing the battery out of a UPS for a day or two, but I’m glad to say it didn’t come to that.

Right before jet lag caught up with me on the first day, Thursday, it occurred to me that no one would know better about where to find a battery than a local ham. A quick Google search led me to the blog of SM0FOB, Kjell Bergqvist. I strongly recommend reading through his blog entries — they’re interesting, even if you’re not headed for Sweden. Anyhow, I noticed that he lived very close to the town in which I was staying, so I shot off an email and turned in for the night.

Kjell's FB QSL card printed on glossy photo paperKjell wrote back the next day and identified two stores within a five minute walk from my hotel, both of which sold a variety of lead acid batteries and chargers. Kjell also suggested that I could just borrow an already charged battery from him, but since I had donated my last battery to the TSA, I thought it better to buy a replacement, plus a smaller charger. The cost was comparable to what I would have paid in the US, so I guess the cost of batteries in Belgium may have been driven more by local taxes or that lead acid batteries are considered more ecologically sound since they are rechargeable and in the end, somewhat recyclable.

Beyond giving me helpful advice about where to buy batteries, Kjell suggested that we go out for lunch on Saturday and visit a couple local hams and their club station. The timing couldn’t have been better, since my first meeting on Saturday was late in the afternoon, so we set a time to meet.

Friday morning, I visited the conference, caught up on email, and picked up a battery. The battery was fully charged when I received it, and since I had some time before an afternoon teleconference, I took my QRP bag and went for a hike.  The hotel is just east of the Handen commuter rail (pendeltåg) station, and just across the railway tracks is a park and a lake. I took a footbridge over the tracks and then followed some trails in the park. I assume that in the winter, these trails are for cross-country skiing. I followed the trail that looked like it led to the greatest elevation, and walked more or less parallel to the lake front. Eventually, I found a nice rocky area to one side of the path, and threw an antenna into a tree.

radio, tuner, earphones on a moss-covered rockThe location was perfect: a rock to sit on and a few other rocks at just the right distance to serve as a desk. The rocks were coated with moss, and the whole area was so undisturbed that I was a bit worried that perhaps people weren’t allowed off the trails. I tried not to bruise the moss and brushed pine needles over my footprints on the way out.

Once set up, I realized that I had not packed an RCA phono cable to go from the keyer to the rig. Luckily, I had some wire leads with alligator clips in the bag. I opened up  both the keyer and the rig and made the connection directly (that’s why the keyer is open in the photo). The rig was the usual — my TenTec 1320 and a longwire antenna tuned with a Hendricks SLT+.

I spent about an hour there and worked four stations: two in Russia, and one each in Bosnia-Herzegovina and Sweden. I didn’t realize that the final station, SK0QO, was Swedish at first. I thought the SK prefix was in Eastern Europe. After a while, I realized that the station was sending to me in Swedish, though, assuming from my “SM0” prefix that I was a Swedish operator. I copied the name of the operator, Jonas, wished him a vy 73, and figured I would look it up when I got back to the hotel room.

When I got back, I did search it on qrz.com, and realized that SK0QO is the same station that Kjell had mentioned in his blog, and that we would be visiting the following day. While I was at the computer, I checked the reverse beacon network, which showed that my 5w signal had made it as far as Canada.

More on that and the rest of the Swedish QRP adventure in the next entry

The Pink Princess Laser Modulator

The pink laser princess box projects a red beam on the receiver boxLast weekend, a bunch of us from the Vienna Wireless Society set up a table for a Sally Ride Science Festival held at George Mason University. This is annual event, which promotes science, math, and engineering for girls in grades 5 to 8. Part of the fair takes place outdoors in the morning and early afternoon, with seminars held indoors in the afternoon.

Since it was drizzly, we set up on three plastic folding tables under tarps.  We brought a smattering of equipment for show-and-tell including a portable satellite station, an HF station, an electronics demonstration, and some of the equipment from our most recent high altitude balloon launch.

My instructions on the event were to bring stuff that would be attractive to kids, so I asked with my kids about what kind of presentation would catch their interest. They suggested demos that would either make noise or “be shiny”. They also suggested candy.

To cover the noise angle, I brought a few morse code keys and paddles hooked to a code practice oscillator. I made a little cheat sheet for sending morse code and handed them out. For the demo, I printed a few sheets of five letter words, chopped them up, and put them in a tupperware bowl. I put another bowl right behind it full of candy and a sign: “send code. get candy. 5 letters = 5 Calories”. I ended up handing out 75 pieces of candy, and some of the kids had good fists. A couple used the paddles in addition to the key.

While I was shopping for the candy at the store “Five Below”, which caters to girls of just this age bracket, I noticed that they were selling laser pointers for $2 each. I figured the little batteries were probably worth that much alone, so I bought four lasers to play with. It occurred to me that I could cover the “shiny” criterion with some sort of laser project.

I had seen on the net a description of simple circuits for amplitude modulation of a laser by an audio signal, so that’s what I put together. Line level output enters through 1000:8 ohm transformer and directly modulates the supply voltage to the laser. A couple diodes are thrown in to protect the laser diode from spikes, but that’s about it. A couple months back, the Dollar store had been selling overruns of Disney Princess puzzles in nice tins, a dollar each, so I had bought a bunch of them for projects that didn’t quite fit the Altoids form factor.

The day before the event, I recorded the audio from my radio tuned to 14.070 USB, to capture USB conversations. I had the 2.4 kHz filter on, so there were quite a few PSK31 conversations in the audio band pass. I saved the sound as a *.wav and transferred it to my ipod. The ipod then plugged into the Pink Princess Laser Modulator.

On the receiving end, the circuit was even simpler, all that stood between a 1.5v battery and the audio output jack was a photoresistor. I knew that I had one kicking around, but couldn’t put my finger on it for most of the day, until I remembered that a CdS photoresistor is included with the Arduino experimenter kit as an optical sensor.  The receiver went in an Altoids box, and the output ran into an audio breakout box that allowed me to split the signal to a speaker and to a computer. I duct taped the speaker to the awning of the demonstration booth and let visitors click on individual psk31 streams to decode them.

Attic Antennas Are Go

Last week, I stuck a RCS-8V remote switch in the attic, and ran some RG-213 and a CAT5 control cable down to the shack in the basement. The switch has five ports (plus the common feed port), so there is lots of room for experimentation. Just in time for the Vienna Wireless Society 10m net on Thursday of last week, I got a 10m dipole in place, peaking near the center of the roof, with the arms following the sloping contours of the roof, running South to North, roughly in the center of the attic. The next day, I put up the Alpha Delta DX-EE multiband dipole, although the ends had to bend a little to fit. In principle, the dipole should tune 10/15/20 and 40m. The DX-EE runs flat from East to West.

I haven’t run an antenna analyzer over the whole set up yet, but I did try everything out in a trial by fire this weekend with the some contests. Before the contests, I did a quick comparisons between antennas.

For most purposes, the 10m inverted dipole and the 10m element in the DX-EE behave the same. The main difference in them is that I cut the inverted V to resonate near the voice segment and our local net, versus the DX-EE favoring the lower portion of the band and CW. Since most of the local net antennas are vertically polarized, I figured that having some vertical component in the local net signal would not be a bad idea. I’ve heard South America on both of them, and they seem comparable.

Comparing the DX-EE to the ground-mounted vertical out back, the dipole shines on the higher frequency bands. For the comparison, the DX-EE is tuned (if needed) via the radio’s internal tuner, and the vertical is tuned through the LDG AT100proII in the shack.  10m (and 12m) are barely tunable on the vertical. They *do* tune, but very little power is radiated. As for 15m, I tried calling CQ and watched the reverse beacon network.  The signal detected by K3MM was 18dB and 36dB above background for the vertical and dipole, respectively. For N7TR, the difference was less marked at 19 vs 22 dB. For 20m, I got similar results for WA7LNW 9 vs 17dB and for W0MU 7 versus 18dB. A number of stations received only the dipole signal.

On 40m, the vertical definitely wins. I am not sure if I can trim the dipole adequately to make it work on 40m, as the ends approach the sides of the attic, one of which is covered in aluminum siding, and the other of which is the concrete wall (rebar?) between our townhouse and the next one. The ends of the antenna take a jog right around the 40m traps, and the right angle turn may be too sharp. When it comes to lower frequency bands, the vertical is my only choice right now. I think this means that some sort of loop antenna is in the cards.

I took park in a few of the weekend contests. The WAE SSB contest ran all weekend, but was made difficult by two periods of unsettled solar conditions. Nonetheless, I made contacts with a bunch of countries including Austria, Belgium, Bulgaria, Croatia, Denmark, Estonia, France, Germany, Hungary, Italy, Luxembourg, Netherlands, Northern Ireland, Poland, Romania, Serbia, the Slovak Republic, Slovenia, Spain, the Ukraine, and Wales.  Not too bad for voice. Most of the contacts were on 20m, but some were on 40m, so both the attic and external antennas got a work out. I’m not sure if it  was the propagation, my antenna or just the nature of the contest, but I didn’t work stations on 15m.

While WAE was running in N1MM, I used my regular logging program to keep track of the other contests and events  going on over the weekend. I worked a fair number of stations in the Arkansas QSO party by voice and CW, and even a few parks on the air in Ohio and Indiana.

I had some firsts as well: I ran across a station calling CQ from Guyana, so that’s now in the log book. I also randomly dialed over to 60m and found that my tuner can match the vertical. I’ve never heard a QSO on 60m, so I tried calling and got a response from Chuck, KD8NLL. So, I guess that band does work after all.


MDC QSO P 2011

the logo for the Maryland-DC QSO Party "The Fun Contest"Last weekend, National Institutes of Health amateur radio station W3NIH went on the air to participate in the Maryland/DC QSO Party. The event ran on both Saturday and Sunday, plus a break in the middle. It’s been quite a while (as in, years) since the club has participated in a contest, and I had suggested that we try out this local, low pressure contest to gauge interest in this and other on-air activities.

While the club has a couple contesters, most of the members are more casual operators, and not all have experience in operating on HF. Nonetheless, a couple members made their first HF contacts during the event, and perhaps we enticed our one unlicensed guest to get her ticket.

We ended up working from about noon to 6 pm both days, with more phone than cw contacts. I don’t have the log in front of me, but I think we ended up with an estimated score above 20,000 or so. We were somewhat limited in cw because of the WAE contest the same weekend. 20m cw was bristling with European station. When we did go to cw, we tried not to pick bands accessible to EU, but even so, contesters there sniffed us out (yes Germany, Bulgaria, Slovenia, Russia, and Northern Island, I am looking at you). They were no doubt confused to get an exchange of “CLB MON” instead of “599 001”, but at least a couple knew about the QSOP and sent “STD DX”.

The NIH has a reasonably well-equipped station with an excellent antenna farm, mounted on the roof of one of the buildings on the main campus in Bethesda — a spiderbeam, a couple dipoles with broad coverage, a semi-functional GAP challenger vertical, but the radio room is not used frequently. As a contest station, it would take some work to optimize the room for efficient and comfortable operation. We’ll have to see after this event if any appetites have been whetted, and whether W3NIH will ride again in some other contest.

Listing of DX Cluster spots from 3 stations, one in Spain
We were spotted!

Controlling DTR in virtual Windows

[This was written a couple years ago, but is archived on a site that I am not maintaining, so I’m duplicating it here as well, to make sure that I have a “living” copy and to put it in the backup stream of this blog.]

When my HP laptop went belly up after four and a half years of heavy use, I replaced it with a MacBook Pro … and thus began my reorientation towards the Mac-side. I made the switch for professional reasons including a desire to have access to a unix command line without needing to run a virtual machine or cygwin on the PC. From that perspective, I am very happy with the Mac, but migrating from Windows to Mac was more difficult in terms of amateur radio-related applications.

My needs are not overwhelming, and I was hoping to find some Mac equivalent for each application that I use. Categorically, I needed programs for logging, contesting and working digital modes. For these purposes, my solutions on the PC were N3FJP’s Amateur Contact Log 3.0, N1MM logger, and MixW, respectively.

It didn’t take me long to realize that the selection of software was much more limited on the Mac side. This is not surprising considering that Macs are relatively expensive and have less market share than PCs. Since many ham software developers are hobbyists, naturally they will develop for the computer that they are using themselves and which would benefit the most users. Don’t get me wrong: the Mac is a well-engineered machine with plenty of horsepower, but even for real time signals processing applications, a cheap PC does the job just as well. I suppose that I could just pick up a used laptop for ham-radio uses, but it just seems more elegant to me to make everything work on the Mac.

For logging on the Mac, there is MacLoggerDx, a very stylish program that has some nice bells and whistles and sells for more than 90 dollars. As such, it’s the most expensive logging program I can recall — likely due to the small market. A major selling point is that it can be extended through Applescript, and there is a community of users contributing scripts. For contesting, I haven’t seen anything on the Mac side that rivals N1MM logger, which has been used for so long by so many people, that it has been honed to a fine edge. For digital modes, some users have developed and shared programs (see several by W7A7 including cocoaModem), but even the most advanced of these suites lack the breadth and stability of their PC counterparts.

After thinking long and hard, my decision was to not abandon the programs that work so well on the PC side, but to run them in a virtual machine. I wasn’t sure this would work, given the need for real-time processing power and external hardware interfacing, but I can attest that this solution is practical. My Mac runs OS X 10.5.5, and for virtualization, I run Windows XP Pro SP3 under Parallels v3.0, with 512 MB memory allocated to the VM. More memory might be nicer, but I can assure you that this minimal configuration works fine. I do not have experience with VMware Fusion, but would guess that it would work in an analogous manner (perhaps someone would like to try this and let me know). As an aside, I have tried running N1MM logger and MixW under CrossOver on both the Mac and Linux platforms, and I could never get that to work entirely. Unlike Parallels and Fusion, CrossOver is not an emulator, but a commercial version of the linux-based wine project.

a Kenwood CAT connector cable DIN connectorMy goal was to integrate operation of a Kenwood TS-450S and a 2.2 Ghz Intel Core2Duo MacBook Pro. The first issue was one of hardware — how to control the rig from the computer. Previously, I bought a CAT cable on Ebay for around five dollars, and it worked flawlessly for years. The circular DIN connector plugs into the radio, while the other end of the cable, a nine-pin male serial connector (i.e., a DB9 connector) plugs into the computer. That was fine for my old HP laptop which sports an appropriate serial port, but it’s bad news for the MacBook Pro which, like many more recent laptops, entirely lacks serial ports. And this is where the witchcraft begins.

Keyspan USB to serial (DB9) adapterThe obvious answer is to buy a USB-to-serial port converter. I picked up the Keyspan USA-19HS adapter (at left) for about thirty dollars on the web. It is a very popular device, and I’m sure it works well for most people’s applications either under MacOS X or Windows, but it turned out to be the wrong choice for trying to combine them. There is a long thread of postings  thread of postings on the parallels support page regarding user frustration trying to get this adapter to work from within Parallels. In theory, there should be two mutually exclusive approaches: 1) Mac-centric — install the MacOSX drivers and then start up the virtual machine. Configure the virtual machine to use the “serial port” that it sees in the Mac environment; 2) Windows-center: within the virtual machine, install the Windows drivers for the device. Then, configure parallels to use this USB device. The latter seems cleaner to me, but fails utterly. The adapter comes with a driver disk that includes a nice diagnostic program which indicates that the port is not working under windows. Trying the Mac-based approach worked better. I found an excellent article by Brian Williams on Mac OS X Hints which detailed his experiences trying to do essentially the same thing. He describes a non-commericial program, serialclient, which makes the Mac-side serial port resource available to the VM.

Following the instructions in the Mac OS X Hints webpage, the MacOS X drivers are first installed, then the adapter is plugged in, and Parallels is launched. Briefly, using the configuration screen in parallels, a serial device is created as a socket in server mode and mapped to a file (e.g., /tmp/serial). A windows session is then launched. To actually enable the serial port, the helper application serialclient is then launched on the Mac side, with appropriate parameters for the connected device, as well as the name of the file serving as the “socket” above. Now, when you hit the “connect” button on serialclient, it links the file on the Windows side to the resource on the Mac side. The port is no longer available to OS X, as it has been redirected to Parallels. At this point, Windows should have a virtual serial port (e.g., COM1:) and you can launch your application.

Homemade optoisolator and one-quarter inch plugAmazingly, all of the above actually works — but there are some caveats. First, this set up occasionally goes down in flames. I’ve had the laptop freeze up a few times, requiring a hard reset. It should be possible to control the port from within Windows, but it is not. Within a DOS shell, the “mode” command should be able to set COM port parameters, but this is not the case. This set up relies on a non-commercial bit of glue, serialclient, that is not supported, was never intended to be used in a general manner, and which might evaporate without warning or break with subsequent releases of Parallels. The deal-breaker for me, though, was that the DTR line does not function correctly.

Since the Kenwood uses RTS/CTS flowcontrol for its CAT functions and does not make any use of the DTR signal, I figured that I could use DTR for keying the rig, getting two-for-the-price-of-one from this serial port. A number of programs, for example N1MM and MixW can be configured to use DTR to key CW.

To use the DTR line, I built an opto-isolated interface according to this schematic provided by WM2U:

Essentially, a resister, an optoisolator IC and a diode to keep the electrons flowing in the right direction (click on the image at right for detail). I put this board inline, just before the 1/4″ plug that goes into the radio. In my case, since I want to be able to drive the radio from either an external keyer or the computer, it actually feeds into a Y-adapter. The other side of the Y-adapter goes to a K-12 keyer by K1EL and paddles.

An extra wire has been soldered to ground and DTR The shielded line upstream of the optoisolator taps into the ground (pin 5) and DTR (pin 4) contacts of the CAT interface. I had to scrape away from plastic goop to get to these pins. Some diagrams show this connector from one direction, some from the other, so to be sure about orientation, check for continuity between pin 5 and the connector’s shield (assuming it is playing by the rules). The CAT is now a CAT of two tails — one going to the rig as before, the other going to the KEY port.

I tested this set up from the Mac side using the cocoaPTT program to toggle the DTR line, and it worked fine. However, when I set up parallels as above using serialclient as a conduit between OSX and Windows, the DTR line activated as soon as “connect” was hit. Initially, I thought that this was a Windows-related problem, but this does not appear to be the case. No matter what I did, as soon as I enabled the serial port under Windows, my key went down and stayed down. Not ideal operating procedure.

A close-up image of the optoisolator, diode and resistor interfaceFinally, I tried replacing the Keyspan USB to serial adapter with one that I ordered from ZLP electronics in the UK. The ZLP device is much simpler, a short piece of wire with USB on one end, and serial on the other, with no indicator lights or other features. The device was shipped without driver software, but this turned out not to be a problem. Having removed all of the keyspan drivers, I loaded up my Parallels VM and booted the virtual Windows XP session. I then plugged in the adapter resulting in a “new device detected” message from Windows. Windows asked if I’d like to let it search Windows Update for an appropriate driver, and I let it do so. Within a few seconds, I had a functional serial port.

The only thing left to do at this point was to configure programs according the radio’s specifications. For the Kenwood 450, the settings are 4800 baud, 8 data bits, no parity, 2 stop bits. Here’s N1MM logger as an example.

The ZLP adapter works without any need for the serialclient program or other kludges, and it does not have any difficultly driving the DTR line correctly. I’ve used this set-up for a couple weeks now in conjunction with a number of Windows-based programs that use the serial port. So far, no problems.

adapter from EZP: USB to serial (DB9)Even with the overhead of running the windows emulation, the MacBook Pro does not come up short on processing power (e.g., I can be following many simultaneous digital mode conversations at once and otherwise multitask without putting a dent in performance). I have experienced no problems in terms of serial port latency or variations in timing of CW due to processor load. I should also mention that as the Mac is entirely encased in aluminum, I’ve had no problems with stray RF emission from the computer itself.

I’m sure I’m going to catch flak from Mac diehards who understandably want to see native applications developed for the Mac platform, but my conclusion is that when it comes to amateur radio applications, the most expedient way to access a wide library of popular and well-tested programs is to teach the Mac to be a PC. Over time, I am hopeful that the best of the ham-related windows applications will be ported to the Mac and that new Mac-native programs will be developed.

And that makes 50

A qsl card to ai4sv from n7mzw confirming a sideband contactI’ve never been overly concerned about collecting QSL cards, but it has bothered me for some time that I had not completed the basic WAS on LOTW because I lacked WV, DE, and WY. Both DE and WV are pretty close in, and I usually skip over them with my vertical antenna. All of these states have relatively small ham populations as well, and it seems like the ones that are there are not really into electronic QSLs. I’ve made more than a few contacts with each of these states, but had no electronic acknowledgement.

Last week, I went through my collection of physical QSL cards and dug up one from WV, but didn’t see any from DE or WY. I decided that while it would be nice to have them all in one place on LOTW, maybe it was time to do things the old fashioned way — so, I searched my log for those two states and shot off real QSL cards. Delaware came almost immediately, and yesterday, one finally came from Wyoming. Thanks N7MZW!

I still have to get these cards officially recognized through some arcane process that I think happens at hamfests, but in my mind, I’ve checked the WAS box.

Arissat1 – First Attempt

a graphic of Arissat1I got up a bit early this morning and parked the car on top of the 6-story NIH garage in Bethesda to catch the 10:45 UTC (06:45 local) pass of Arissat-1. From there, the view North is unobstructed. The max elevation on this pass was 20 degrees, with AOS at azimuth 304 and LOS at 94, almost ten minutes in duration.

I tuned to 145.920 on USB and twirled the RIT back and forth above that frequency because I wasn’t sure how much doppler shift would matter. About a minute and half in, I picked up the CW beacon. I did not hear the bpsk signal as clearly as in this audio file. Here is what I heard this morning: Audio from Arissat-1 attempt #1 from FM19km.

In principal, to decode the BPSK1000 signal, the lower cw beacon should be kept near 500 hz. I tried my best, but after today’s experience, I realized I need something to look at — either some sort of spectrum display or the windows version of the TLM software. I had not played with the software earlier, but hoped that if I kept the signal within the receiver’s bandwidth, the decoding software would be pretty tolerant to centering, and might even track the signal pitch. Well, that is not the case. Maybe I can somehow pitch shift what I’ve captured, but I think the more practical solution is to try again, adjusting pitch live.

I did switch briefly to FM and heard just a couple syllables of speech before it went into SSTV mode and faded to static. In the above audio clip, the first part is USB, and you can easily pick out the CW signal. About halfway through, I switch to FM and you can definitely hear the SSTV, although the signal goes up and down rapidly (changing orientation of the satellite?).

I have to admit, this was something of a last minute effort, but I did remember to throw an audio splitter cable and the computer into the car before taking off to work today. I am not using a special antenna — just my trunk-mounted antenna (1/2 wave on 2m, 3 dBi). Considering that this was all before coffee, I guess I should consider myself lucky to have heard anything at all.

Later in the day, I fired up the Mac version of the TLM software, which seems less developed than the windows version. I tried to import a wave file, and it seemed to hang for quite a while, but them became responsive again. I assume it was trying to decode the bpsk, and having a hard time because the signal is very low in my recording and the frequency is all over the place. Unfortunately, for purposes of troubleshooting, no sample file is available on line, although the Arissat website says one will be posted shortly.

There’s another higher-elevation pass tomorrow at 11:23 Z / 07:23 local, and I’m planning to be set up for it. This time, I would use the PC-based version of the TLM software, which provides a real-time frequency analysis to keep the cw beacon in a narrow-enough window to center the bpsk1000 within the expected bandpass for decoding.

It would be helpful if I could figure out when the satellite is in eclipse, to know when it will be operating in lower power mode. I assume that it’s keps are not very stable, so I’ve just been going to the orbit prediction page.

Addendum: Not sure why the Amsat page just went down this evening (Aug 4th), but there’s another tracker that does a nice job — it shows whether the satellite is in eclipse or not, and if it is likely to be visible. It also provides real time tracking: