
 I envision having a few antennas: the hexbeam, the G5RV, lindenblads for 70cm and 2 satellite work, perhaps a vertical of some sort if I can figure out where to place it, and maybe some kind of beam antenna for six meters. To make all that work, I’ll need some sort of way to bring the lines in the shack and to switch among them. I brought four alpha-delta four position switches, which should be enough to both perform this function and switch the lines to the available rigs. With that intention, I laid the switches on the bench and drew out the wiring diagram.
However, I never got there; not yet, at least. After piling up some connectors and coax and wood, I realized that what I really needed in the garage in order to do this sort of work was some kind of background noise to keep me entertained. So, I pushed the very useful antenna switching project to the side and turned back to the computer that I had fried a few weeks ago by plugging it into the 230V while its power supply was set to 110V.
Step 1. Fix the computer. A replacement power supply came in the mail; not too bad, about a month after I ordered it. This time, I very carefully switched it to 230V and taped the switch in place with a stern warning to myself not to move it. This part of the repair went uncharacteristically well – the supply just slid into position, and was connected and secured with no hassle.
Step 2. Turn it on. When I had packed this computer, my daughter had told me that it didn’t work. I was taking something of a chance installing the power supply in a computer that might itself be dead, but what is life without this sort of daring? I connected up monitor, mouse, and keyboard. After steeling myself against the half-expected bang and sizzle that had occurred previously, I was relieved to hear the computer boot. However, the monitor remained black. The monitor had powered up with an ASUS splash screen and the power LED was on, but nothing. I poked the monitor a bit and got a flash of what looked like a windows logon screen – ah, I thought, the monitor was the culprit. Probably some transient bad connection inside the monitor. I swapped out the monitor, et voilà, I had a working computer. After dragging my daughter to the garage to login, I was able to create an admin account, move her files to flash drives and start with a fresh slate (she had long since migrated to a laptop).
Step 3. Enable Wifi. The garage is some distance from the house, I know that the house has enough concrete and rebar that wifi signals from the living room don’t make it to my office at the other end of the house. To get wifi in the office, I had to run ethernet from one area of the house to the other and bridge to a second wifi router. This is why I over pack. The computer in the garage showed no wifi signal, although I can sniff a few signals including my own just outside the garage. I started looking in the pantry for large cans to make a microwave cantenna, but my eyes settled on a plastic milk container first. The diameter of the milk container is just about the same as the ventilation hole on the side of the garage facing the house. Before starting in on a cantenna, I grabbed a USB extension and a wifi dongle, stuck them in the milk bottle and pushed it through the ventilation hole such that the wifi dongle was outside the garage, but protected from the elements within the plastic bottle. Inside the garage, I plugged in the USB and confirmed that even with the house’s screen door and the metal garage door shut, I had full throughput on wifi.
Step 4. Create router. Wifi is nice and I can certainly play youtube or stream audio from the computer, but I’d also like to be able to bring my cell phone or other computers into the garage. I had only brought two wifi routers to Madagascar, so I had to use the computer itself as a wifi repeater. Initially, I considered plugging in two wifi devices, but then I recalled that  Windows 7 allows a computer to use a single wifi device as a virtual hub. After about an hour of downloads and reboots to bring the computer up to date, I downloaded Maryfi, which automates the process of starting and stopping the service. The only trick here was to run the program with admin privileges so it can write settings such as the network password to disk. I found that my Macbook Air was able to obtain an address automagically through DHCP and seemed as fast as in my office. I had more difficulty with an android phone, which would authenticate, but then hung forever “connecting.” A bit of googling turned up reports of similar experiences with android devices. The solution is to use “advanced options” on the phone to set a static IP. Once this was done, the phone was able to connect and disconnect without a problem.
Step 5. Create speaker. I went to youtube and played a video. No sound. I pulled some speakers off the shelf and plugged them. Sound, but not much. Like, not really audible a couple inches from the speaker. It’s not a big garage; I had hoped for enough sound to fill it. Back in the day, a sound blaster card would drive unamplified speakers, you know. The manufacturer of this integrated motherboard, however, decided to skimp on that feature, alas. Pawing through my box of computer junque, I did find a pair of amplified speakers, but I wasn’t happy devoting so much bench space to them. They were kind of unwieldy. I thought I had a better idea — why not stick a speaker inside the case itself? I have a pile of old speakers and the computer case had an excellent spot just begging for a speaker.
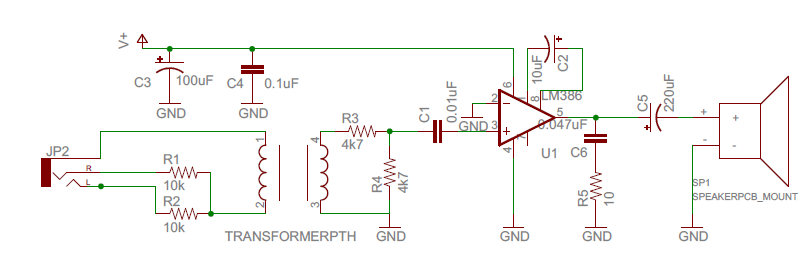
Step 6. LM386 Fail. What’s easier than to stick an LM386 audio amp on a board and call it a day? I have a sleeve full of them. I breadboarded out a reference design. Do I need bass boost? No, not really. No desire to vibrate the computer apart. How much gain? I went empirically with this one and adjusted a pot on the input to a nice level. With the chip set for 200x gain, I adjusted the input voltage divider to half way, and that seemed to work well with the range of levels that I wanted from the computer. I yanked the pot and replaced it with a resistive divider made of two 4.7k resistors. Stereo? No, mostly I want to listen to podcasts and youtube videos. I stuck a 10k resistor on each audio channel and combined their outputs as passive mixer that would play nice with input impedance. That’s it. I powered it up with a 5V bench supply and it sounded great, whether driven by audio from my cell phone or the computer. Next, I tried to get clever. I thought it would be neat to power the amplifier from the ATX power supply’s 5V rail. However, when I did this not only did I get back hum, but more disconcertingly, I heard every little movement of the drive head, buzzing from the CPU, etc. What had happened?
Step 7. Improve Ground. Dealing with RF most of the time, my first though was that I must be picking up RF. But wait — all the audio lines are shielded and connections are short. Could my power supply really be that dirty? Didn’t I have filter caps across the amplifier’s power input? Although the board was grounded by virtue of the power lead, I screwed the board to the chassis to assure a solid, mechanical ground. That did not help a bit. Then I realized that I was suffering from a surfeit of grounds — both the power and the audio ground. Differences in return current were being amplified. I confirmed this by powering the unit from the bench supply with the same input – no problem, and then powering the board from the computer power supply but using my phone as the source of audio, also no problem. I had to break this vicious loop. Back to the junque box.
 Step 8. Transform situation. A number of small transformers were rolling around in the box-o-junque; they all looked like audio transformers of some sort. I had three yellow ones, which I think came from a modem. Resistance was about the same on the primary and secondary sides, so I ran some 1 kHz audio from my phone through one side and measured AC voltage on both sides — equal. Good, so this was a 1:1 transformer, which I supposed would work for galvanic isolation. I then searched the number (yes, should have done this first, would have saved a lot of time) and confirmed that that’s what they are.
Step 9. Try again. I modified the earlier circuit by sticking the transformer after the passive mixer. I have to admit that even with that I was getting a bit of drive noise, so I also stuck a 0.1 uF capacitor on the power input. That tamed the beast. The only thing I now hear is the faint hiss of the LM386 itself when the volume is turned up. Finally, I stuck a very flat rocker switch on the top of the computer case since I wouldn’t always want external sound and closed the box up.
So, sort of, success. I don’t have an antenna switch, but I have a better environment to build one next week.